Need help with a Somfy product?
Browse videos & data books below.
If your unable to find the right answer or need further assistance, contact us.
How to Add a New Somfy Remote
Adjusting Upper & lower Position of Motorized Roller & Solar Shades
InsolRoll Radio Motor Programming Quick Reference
Waking up radio motor and checking limits
- Per up one motor at a time. Motor will respond with a quick up/down jog.
- Take remote/switch and put it on desired channel you want motor to operate on by pressing set button.
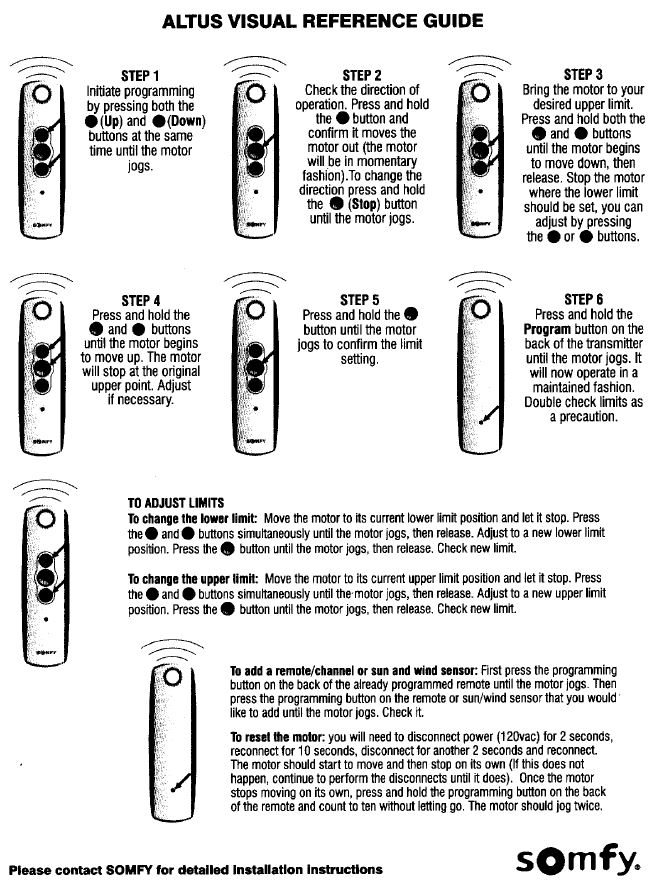
- Press the UP and DOWN buttons together on remote/switch until motor gives you an up/down jog.
- Locate programming button. For remote programming button on back. For switch button on front. Special instructions apply for other devices and additional steps may be needed. Press button until motor jogs up and down. Programming complete. Please refer to attached packet for more details and steps if needed.
Readjusting limits for radio motors
*if the upper and/or lower limit needs re-adjusting do the following:
TO CHANGE THE LOWER LIMIT: Move the motor to its current lower limit position and let it stop. Press the UP and DOWN buttons simultaneously until motor jogs, then release. Adjust to a new lower limit position. Press the STOP/MY button until motor jgs, then release. Check new limit.
TO CHANGE THE UPPER LIMIT: Move the motor to its current upper limit position and let it stop. Press the UP and DOWN buttons simultaneously until motor jogs, then release. Adjust to a new upper limit position. Press the STOP/MY button until motor jgs, then release. Check new limit.
NOTE: Add group channels and/or additional devices at time of programming as you go from share to share in the installation.
PLEASE NOTE: For accurate programming of all devices, power must be connected to one shade at a time.
Adding additional transmitters/devices
- Select a working channel on a previously addressed device and using a paperclip, press and hold the PROGRAM button until the shade responds with a quick up/down jog.
- Select additional device, choose desired channel and using a paperclip, press and hold the PROGRAM button until the new shad responds with a quick up/down jog. Additional (new) device is now added to shade memory and can be used to operate shade. Test operation.
Assigning or deleting specific channels to shade
- Select a working channel on a previously addressed device and using a paperclip, press and hold the PROGRAM button until the shade responds with a quick up/down jog.
- Select desired channel.
- Press and hold the PROGRAM button on the device until the share responds with a quick up/down jog. Additional (new) channel is now added or deleted to/from shade memory. Test operation.
Setting an intermediate position
(One intermediate position available per motor)
- Press the UP or DOWN directional button on the previously addressed device until the shade reaches a desired intermediate position, then press MY (stop) button to stop. If necessary adjust the desired position with a brief press of either UP or DOWN button.
- Once the desired intermediate position is reached, press and hold the MY (stop) button on the transmitter until the shades responds with a a quick up/down jog. Intermediate position is now added to memory.
- Activate the share intermediate position by pressing the MY (stop) button from ANY shade position. Test position.
TO DELETE: activate shade to intermediate position, then press and hold the MY (stop) button for 5 seconds. Share will jog to confirm deletion. Check deletion.

